

A mouthwatering Kitchen Sink Cookie Recipe that is filled with all the delicious sweet and savory bits! These cookies are so easy to make, freeze extremely well and make the best edible gifts!
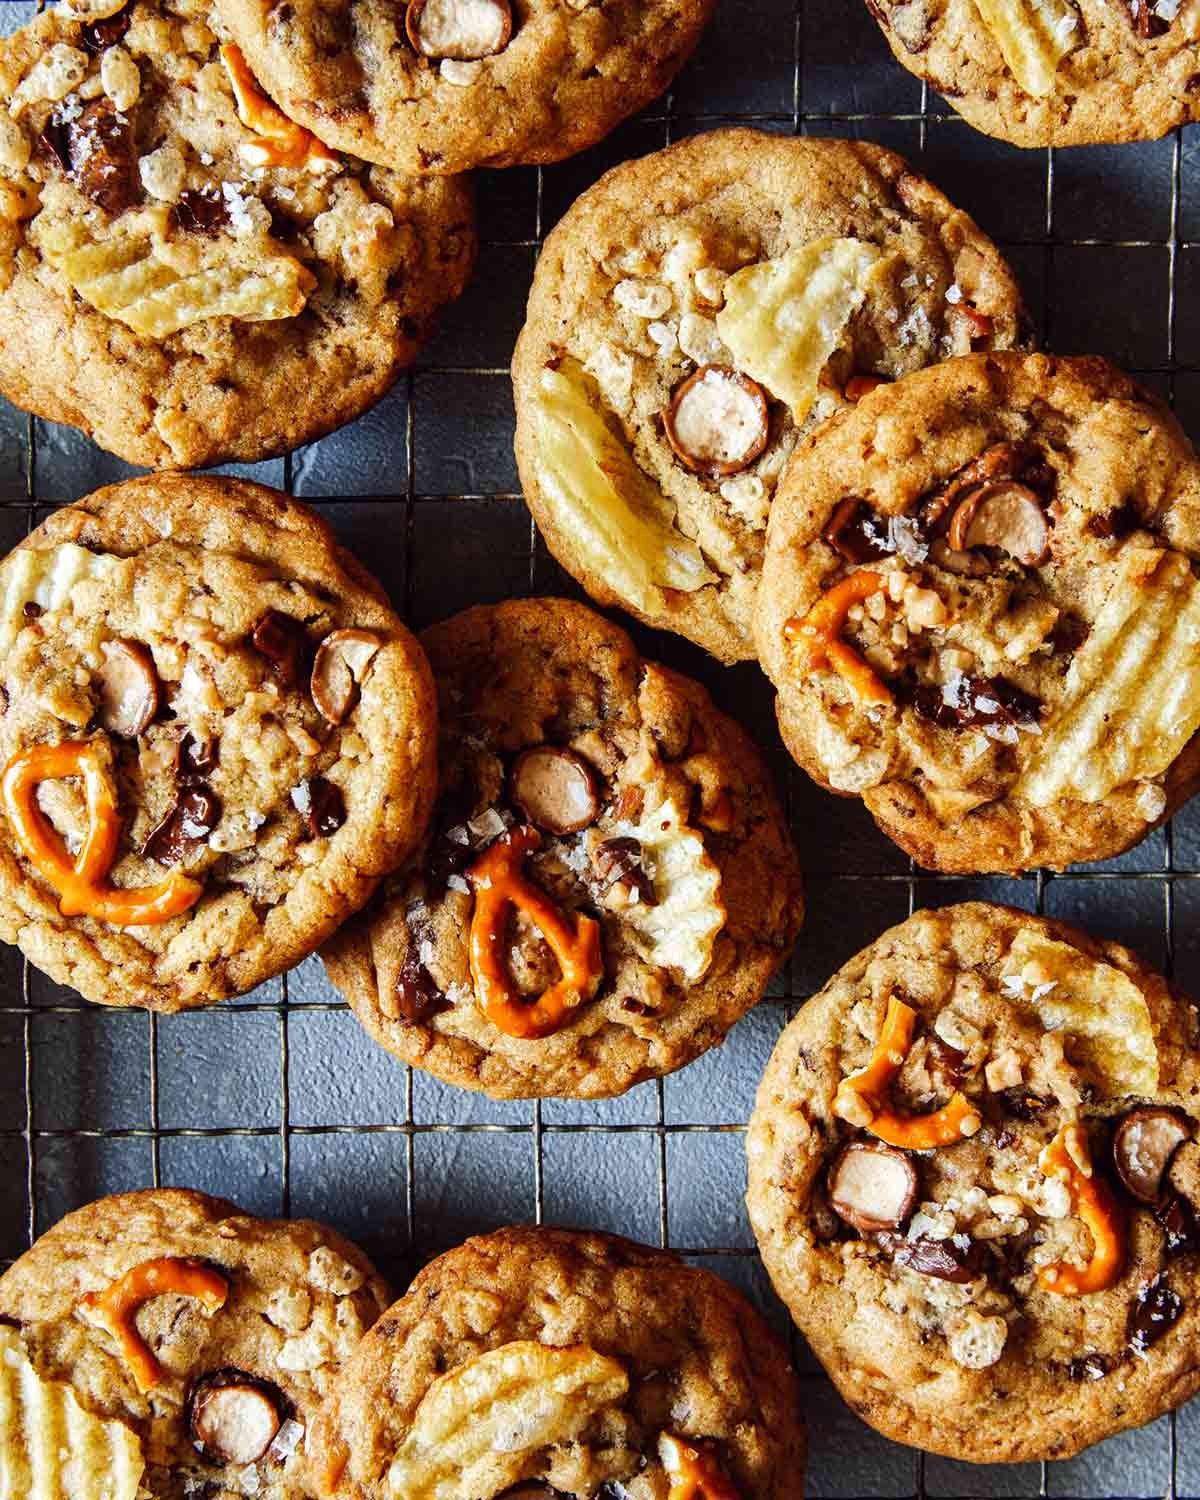
Our Kitchen Sink Cookie Recipe is very high on our list of all time favorite cookies. There’s A LOT going on in there and it all works! These cookies are sweet, salty, soft, chewy, and crisp.
The ‘over the top nature’ makes them the perfect holiday cookie, but the simplicity of making them will have you baking batches up all year long! We also love how flexible this kitchen sink cookie recipe is, you can add or omit things based on your flavor and texture preference.
Why are they called Kitchen Sink Cookies?
They’re called kitchen sink cookies, because they have “everything but the kitchen sink” in them! You basically raid your pantry for whatever sweet and salty goodies you have on hand, crush them up and add them to the dough to make a wildly delicious cookie!
How to make this Kitchen Sink Cookie Recipe?
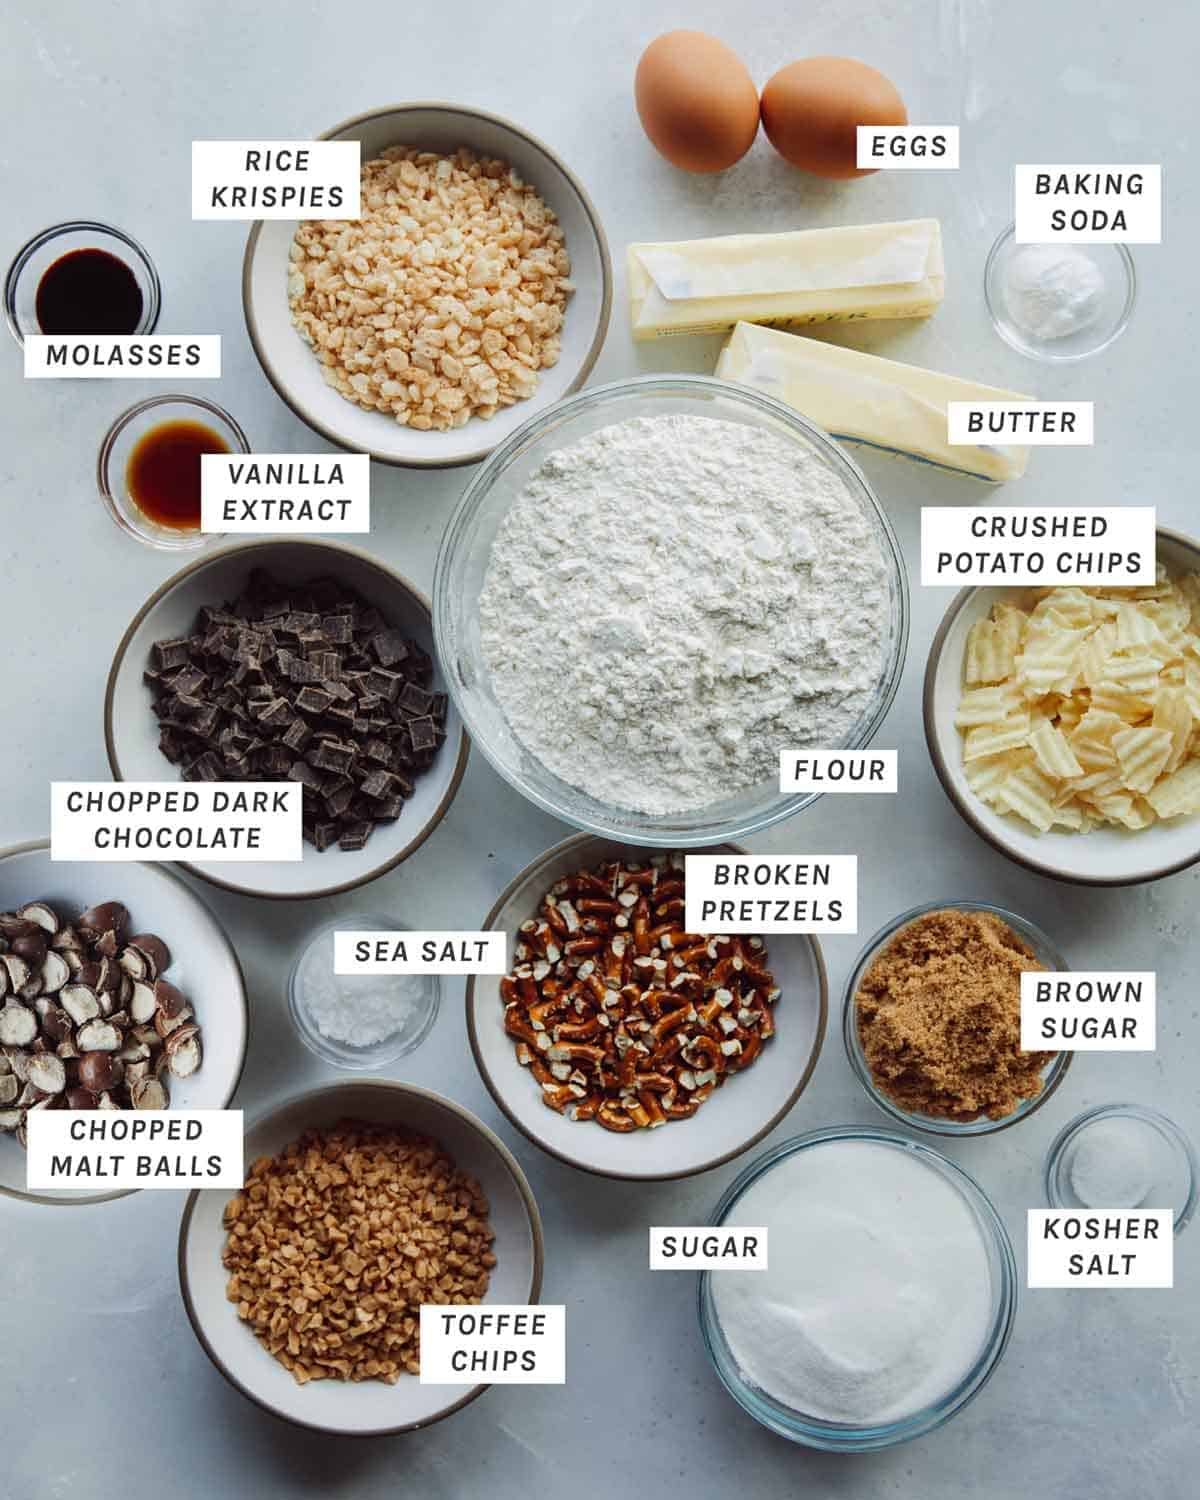
Ingredients for Kitchen Sink Cookies
Tools you will need
Process
- Melt some butter in a small saucepan and continue to cook until butter begins to smell nutty and lightly browns.
- Remove from heat and cool.
- Place browned butter and remaining butter in a bowl and using an electric mixer (or stand mixer fitted with a paddle attachment), beat together.
- Add both sugars and continue to beat together until light and fluffy.
- Scrape down sides of the bowl, add molasses and vanilla and continue to beat together.
- Beat in egg and egg yolk.
- In another bowl whisk dry ingredients together.
- Add dry ingredients to the butter mixture.
- Beat together until a dough comes together.
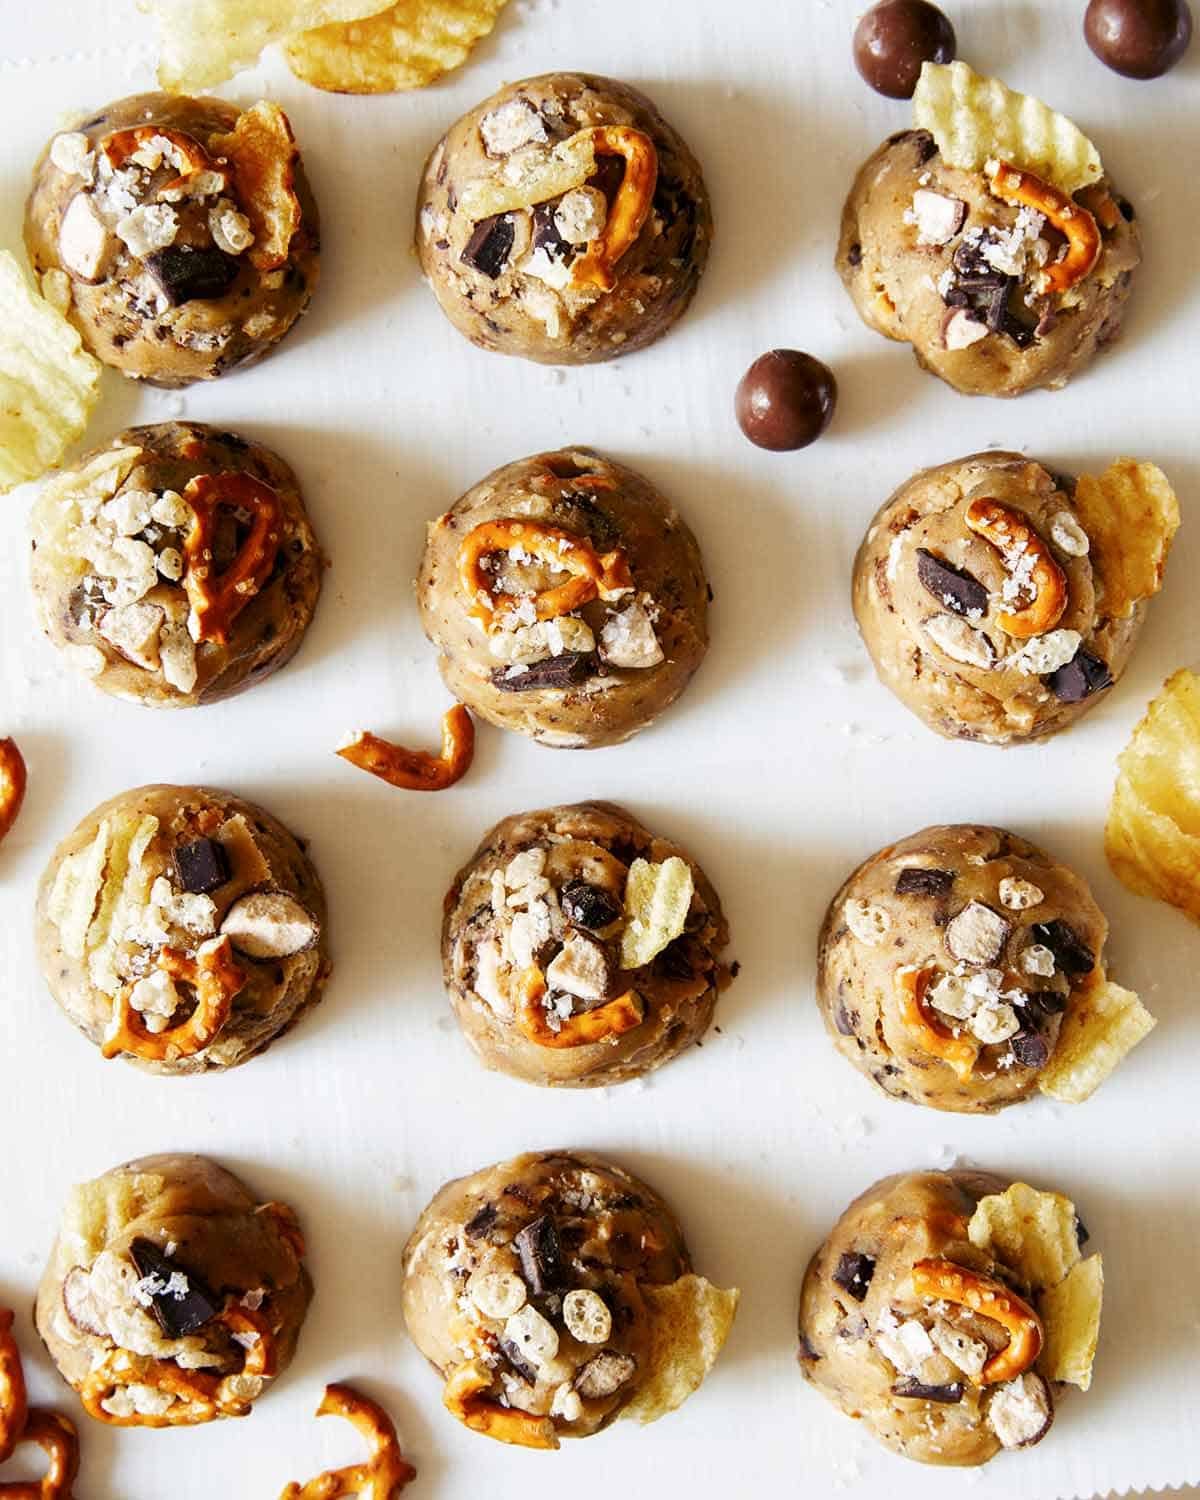
- Fold in mix-ins (you can also reserve a little of each mix-in to press onto the top of each cookie, before baking).
- Wrap dough in plastic wrap and chill in the refrigerator.
- Preheat oven to 350˚F.
- Scoop dough onto a parchment lined baking sheet, about 1 ½ inches apart.
- Press any extra mix-in into the tops of the cookie and then sprinkle cookies with sea salt flakes and bake for 12 to 14 minutes or until cookies are golden brown.
- Cool cookies for 5 minutes before transferring to cooling rack.
- Continue to cool cookies. Serve.

Tips and Tricks for Success
- Chill the dough – this will prevent the dough from spreading too much when baked.
- Don’t over mix – over-mixing with cause the cookies to become flat and crispy, instead of soft and chewy.
- Press extra mix-ins into tops of cookie dough scoops – we love doing this to make the cookies even more visually appealing!
Kitchen Sink Cookie Variations
There are so many different mix-ins you can sub in or out of this Kitchen Sink Cookie Recipe, which is why we love it so much. We just recommend using a blend of sweet and salty mix-ins. It’s also important that the total amount of mix-ins doesn’t excess the overall amount we used (4 1/3 cups) to ensure everything holds together with the dough base and bakes evenly.
- vegan mini marshmallows (if you use non-vegan marshmallows, they will totally melt and dissolve into the cookie)
- butterscotch chips
- milk chocolate chips (if dark chocolate isn’t your jam or if you just want to double down on chocolate goodness!)
- chopped candy bars (such as Snickers, KitKats, Reeses Peanut Butter Cups (or even Reeses Pieces!)
- white chocolate chips
- crushed butter crackers (such as Ritz)
- crushed saltines or oyster crackers
FAQs
Yes, this dough (base) is more stiff in general. To test the dough, take a small amount of dough in your hand and give it a squeeze. If it holds together it’s okay. If it crumbles the dough is a little dry.
If your dough looks crumbly, it’s because it was over-mixed. To fix this issue, gently beat the remaining egg white into the dough mixture until fully incorporated.
Yes! The dough can be made, wrapped in a disc and chilled up to 5 days ahead of time.
Yes! To freeze, scoop chilled dough into individual cookies and place onto a baking sheet lined with parchment (make sure the scoops of dough aren’t touching one another). Place baking sheet in freezer until scoops are fully frozen. Remove frozen cookie dough scoops from freezer and transfer to resealable freezer bag. Remove as much air from bag as possible and seal. Place bag in freezer for up to three months.
When ready to bake cookies, transfer frozen scoops onto a parchment lined baking sheet about 1 1/2 inches apart and bake for 17 to 20 minutes.
Yes! Place baked (and cooled) cookies onto a parchment lined baking sheet, in a single layer, and freeze. Once cookies are frozen, transfer to a resealable freezer bag. Remove as much air as possible from the freezer bag and seal. Place cookies in freezer for up to 3 months.
When ready to serve/eat. Remove cookies from freezer and set out at room temperature until cookies have thawed, about 30 minutes.

More Cookie Recipes You’ll Love!
We love this kitchen sink cookie recipe so much. It makes awesome holiday gifts, are perfect for cookie exchanges and are delicious anytime snacking cookies! Some of our other favorite cookie recipes are:
Hungry for more?
Subscribe to never miss a recipe.

Kitchen Sink Cookies
A mouthwatering Kitchen Sink Cookie Recipe that is filled with all the delicious sweet and savory bits! These cookies are so easy to make, freeze extremely well and make the best edible gifts!
Servings: Cookies
INGREDIENTS
INSTRUCTIONS
-
Melt 1 stick butter in a small saucepan over medium-low heat and continue to cook until butter begins to smell nutty and becomes lightly browned. Remove from heat and cool completely.
-
Place both butters in a bowl and using an electric mixer (or stand mixer fitted with a paddle attachment), beat until light and fluffy.
-
Add both sugars and continue to beat together until light and fluffy.
-
Scrape down sides of the bowl, add molasses and vanilla and continue to beat together.
-
Beat in egg and egg yolk.
-
In another bowl whisk dry ingredients together.
-
Add dry ingredients to the butter mixture. Beat together until a dough comes together.
-
Fold in chopped chocolate, rice cereal, potato chips, pretzels, whoppers, and toffee bits until fully combined (you can also reserve a little of each mix-in to press onto the top of each cookie, before baking).
-
Wrap dough in plastic wrap and chill in the refrigerator for at least 1 hour and up to 3 days. (If chilling dough overnight, allow dough to sit at room temperature for about 1 hour before scooping onto a baking sheet, so dough is still cold, but just soft enough to scoop)
-
Preheat oven to 350˚F.
-
Scoop 3 ½ tablespoon sized balls onto a parchment lined baking sheet, about 1 ½ inches apart.
-
Press any extra mix-in into the tops of the cookie and then sprinkle cookies with sea salt flakes and bake for 12 to 14 minutes or until cookies are golden brown.
-
Cool cookies for 5 minutes before transferring to cooling rack.
-
Continue to cool cookies. Serve.
NOTES
- Chill the dough – this will prevent the dough from spreading too much when baked.
- Don’t over mix – over-mixing with cause the cookies to become flat and crispy, instead of soft and chewy.
- Press extra mix-ins into tops of cookie dough scoops – we love doing this to make the cookies even more visually appealing!
Making Dough Ahead:
- The dough can be made, wrapped in a disc and chilled up to 5 days ahead of time.
Freezing Dough Ahead:
- Scoop chilled dough into individual cookies and place onto a baking sheet lined with parchment (make sure the scoops of dough aren’t touching one another). Place baking sheet in freezer until scoops are fully frozen. Remove frozen cookie dough scoops from freezer and transfer to resealable freezer bag. Remove as much air from bag as possible and seal. Place bag in freezer for up to three months.
- When ready to bake cookies, transfer frozen scoops onto a parchment lined baking sheet about 1 1/2 inches apart and bake for 17 to 20 minutes.
Freezing Baked Cookies:
- Place baked (and cooled) cookies onto a parchment lined baking sheet, in a single layer, and freeze. Once cookies are frozen, transfer to a resealable freezer bag. Remove as much air as possible from the freezer bag and seal. Place cookies in freezer for up to 3 months.
- When ready to serve/eat. Remove cookies from freezer and set out at room temperature until cookies have thawed, about 30 minutes.
Serving: 1cookie Calories: 234kcal Carbohydrates: 29g Protein: 2g Fat: 12g Saturated Fat: 7g Cholesterol: 36mg Sodium: 672mg Potassium: 108mg Fiber: 1g Sugar: 16g Vitamin A: 332IU Vitamin C: 1mg Calcium: 16mg Iron: 2mg
CUISINE: Amercian
KEYWORD: cookies, holiday cookies, kitchen sink cookies
COURSE: Dessert
")
")